Hello everyone!!! Thank you for visiting the page --- It is NEW!! I am new to blogging but thought it would be fun to pass the time talking and writing about something I love to do.. I want to get better because I believe the more you scrap the better you get .. (I can't imagine anyone getting worse) but hopefully I will be able to show you the ideas I come up with and maybe with your help I can get it down much faster!! Thanks for taking a minute to view the page!!!
Ok!! I figured out what Glimmer Mist is ... Finally. I'm posting the you tube video that shows different techniques on using Glimmer Mist on a plain white sheet of paper.... The video is by a lady named Elina Koutsouradi and she shows you about 7 or 8 different ways to use Glimmer Mist. Its pretty interesting and it seems fun.
Thsi next video is by Creations with Christina. She shows you how to make a flower using glimmer mist and diamond dust. I am going to try this as soon as I get a free minute!!!!
Now, I guess I havent paid attention at my local Craft store but I dont recall seeing Glimmer Mist. I will have to look for them next time I go... =)
Also, while I have you here --- I read a blog entitled Scrapperlicious by Irene Tan--- pretty close to Scrapilicious huh?? --- and she has beautiful work to display as well. Well she just got published on an ebook sharing some of her techniques... Check it out!!!! Once you hit the link - click to download and you'll see her article!!!
I hate to do this to you all .... but you will thank me..... I promise!!!
I was looking for new techniques (new to me)... I came across this blog where every layout was made using Glimmer Mist.. I attempted to find out what and how to use it.. The blog had so many tutorials on how the LO were made and knew I had to share them with you.. I will show you the layouts and then an example of one of their tutorials... I gathered all the information from http://what-a-beautiful-mess.blogspot.com/
Take a Look!!!!
Swirly Sweetheart Daisy
I have gotten a lot of feedback for the previous flower tutorial I did, and the biggest question is "What if I don't have that punch"?. Well here is another version, closer to the Prima Eliza flower. I just used my scallop circle punch and cut between the scallops for the large flower and my medium Retro punch to make the rose flower middles. So many possibilities for these flowers. You could use anything for the centers. Bottons would be cute, and you could use the tiny roses if you didn't want to make your own.
Product list
*Scallop Circle punch. 2 inch is a good size
*Medium Retro Flower punch
*Tulip Puffy Paint
*Heat gun
*tweezers (long handle) optional
*Thin handle paint brush or skewer
*ink pad (coordinate color with card stock color used for
flower center)
*Cardstock in 2 colors, one light for flower, the other your
choice color for flower center color.
*adhesive of your choice
*Spray bottle with water (mini misters are wonderful)
Punch 2 scalloped circles.
Using your ink, soflty rub some onto the center of each flower (you may want to use an ink blender, I used the Tim Holtz foam one)
Using scissors cut between each scallop as shown, be careful not to cut to deeply towards the middle.
Very lightly mist your flowers with water and curl them around the end of your paintbrush handle to distress them . You can speed dry them with your heat gun or let them air dry.
Open up the 2 flowers. Set aside.
With your small flower punch, punch out 5 flowers.
Using the thin end of your paint brush or skewer, curl the petals of 2 of the blooms from the side of the petal inwards. Curl the other 3 blooms from the tips of the petals inward.
Place a small amount of glue at the base of each side curled petal and shape then onto each other to get a tight bud as shown. The glue will help the bud stay closed.
Place that closed bud onto the other side curled bloom and fold it onto the closed bud. This is your closed center.
Place glue at the base and the middles of the remaining blooms and place the center bud in the middle of the blooms remembering to stagger the petals. Hold in place for a minute if you are using quick dry glue.
Glue the 2 layers together staggering petals then add the rose to the middle.
Apply the Tulip Puffy paint to the tips of the petals as shown.
When the paint is dry, using constant motion, heat the paint and watch it puff up. Be careful not to burn either the paint or paper.
I had a lot of feed back from my last tutorial.
Here are some variations of the flower. I used the same center as in the previous flower tutorial. Mix and match...You can also lightly ink the edges of the petals.
Now I never learned what Glimmer Mist is.. That will be my homework for tomorrow.... (Maybe) Sorry so long.. I know I said I wouldn't do that again but I had to share in case you all weren't following them.. They do a great job!!!
Hello Everyone!!! Sorry its been a while, the oldest kiddo came down with Strep --- ugh!! Its been a challenge keeping everything germ free to prevent from everyone else getting sick.... ON TO SCRAPBOOKING!!!!
So, While busy at work, I had some time to look up some baby boy album ideas... Down below, (on other posts) I had the dilemma about a light pastel color type paper or darker color type paper to use as his album... I still haven't been able to decide for sure but, I am leaning toward the lions tigers and giraffes (OH MY--- if there were bears) ... ---
Here is a mini album I found that has similar paper--- I love this little video... I want to make something like this in a 12x12 version... but what do you think?? This video was made by GingerCupcakeCards...
Just beware--- I have purchased several stacks of light blues and yellows and greens -- along with the dark varsity pack I was able to show below and the paper similar to this video!!! This weekend should be my deadline to figure this out... He will be here before we know it!!
I want to thank Afternoon Scrapper for the awesome 'Stylish Blog Award' she gave me. Thank you so much for viewing ScrapiliciousVal...
The requirements for receiving this award is to list 8 things about me and to pass it on to 8 other blogs. This is so much fun. :)
About me:
- I am having my 3rd Kiddo.
- I would love to open my own business one day.
- I do have a full time job --- it's rather fun.
- I have tried many new techniques in scrapbooking and they never turn out like in the demo.
- I love girly notebooks and paper
- A friend of mine and I almost opened our own scrapbooking store-- we chickened out.
- I love to eat at on the border!!!!.
- My hubby is very supportive of my scrap hobby!!
Thank you all for the support and making me smile. I enjoy very much following these blogs and many many more-- There are just too many on my list to chose from... I hope you all enjoy and thank you again for the award, Afternoon Scrapper
I am so excited today!!! First, thanks for viewing the post!! I really do appreciate it!!! Another reason for the excitement is because I went to one of my many favorite stores today ---- HOBBY LOBBY!! I "had to get out of the house and get some fresh air" (which translates to --- I wanted to go to Hobby Lobby) and I had seen this you tube video on distress ink.. Now, I am new to the scrapbooking ordeal.. not too new but compared to all the blogs I follow -- which are many -- I am pretty much a novice....
The video is from apieceofcraft.com which distresses the page with water along with the ink pad... I finally decided I was going to try it out... So, I went out and bought a few distress ink pads by Holtz. Enjoy!!! Here is the video I viewed...
Below is a page from acherryontop.com shows you several other ways to achieve the same result but not using any water like the video from above...
Distressing
In the hobby of scrapbooking, distressing can be defined as altering paper or embellishments to give them an aged, vintage or well-worn look. It is a very inexpensive technique that can add a lot of depth and texture to your pages. Distressing looks great with heritage photos, sepia photos and black and white photos. Dry distressing techniques
This is the first LO I created to demonstrate some of the basic techniques:
The first thing I did was cut a strip (3 1/2" x 12") of the Jenni Bowlin Turquoise Wallpaper patterned paper. I then crumpled it up:
Unfold it:
If you want it to be more wrinkled, crumple it again. Next, I used the large sanding file from the Basic Grey Precision set to sand the paper. You will notice that it really makes the creases in the paper from crumpling it stand out.
Next, I inked it using some Ranger Distress Ink. Hold the ink pad over the paper and lightly brush it with the pad. The harder you press, the more ink will be added to your paper.
Here are some tips on using ink to distress your paper. You can hold your ink at a 90 degree angle and it will lightly ink your edges like in this photo.
If you would like more coverage on the edges, tilt the ink pad closer to the paper (making the angle between your paper and ink pad more acute.)
Here's another tip that I learned that I am not sure you knew. When you purchase your Ranger Distressing Pads, they have a flat surface like this:
You can actually pull the top flat surface. It is a great idea to wear gloves when you do this. My fingers were broken china blue for several days.
In the following picture, you can see what it does for your paper. The right edge was inked before I removed the top layer of the ink pad. The bottom edge was after. I love that the bottom looks more natural and not manufactured to make it look aged. Hope that makes sense when you look at this photo:
I placed the paper we distressed next to the original piece so you could see the difference:
I then continued to do the same thing to all of the other papers I added to my page. I kept adding layers of paper to the page. I think that with distressing, the more layers of paper you add, the better it looks. This is just my own personal preference.
Another thing I wanted to show you was paper tearing. I think it looks great with distressed papers and really goes with the worn and vintage look. You can see from looking at my LO that I tore the edge of the Turquoise Wallpaper patterned paper I used on the left of the LO. When tearing paper, I like to place the paper with the pattern face up. I then tear the paper upward. It is hard to show you the exact way I hold the paper while I tear it with one hand on the camera but I usually use one hand to hold the paper and the other to tear. By tearing it upward, you can see the white core of the paper.
The white core will also pick up and show more ink when you ink the edges. If you don't want the white core to show, then place your pattern face down when tearing.
Another distressing technique I used on this LO, was sanding. Again, I used the large file from the Basic Grey Precision Set and sanded the edges of the paper. I also sanded some of the surface of the background paper. Both add more texture to your page.
Again, here's my finished page. With these techniques, keep repeating them and combining them until you get the desired look you want on your page. If the distressing technique isn't giving you as bold of a result as you like, do it again. Keep doing it until you get the results you want.
The problem I was having when scanning these pages was that the true depths of the distressing was getting lost. Here are some photos of the page that might help you see it better.
Anyways, I am so excited I am about to go try all these methods out!!! I hope you guys enjoy the post.. Sorry So Long!!! I'll shorten it up next time!!!!
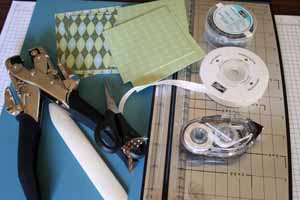
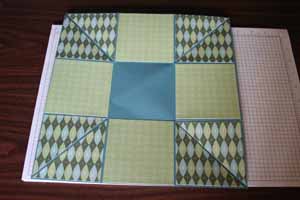
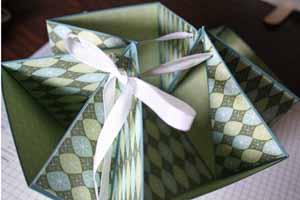
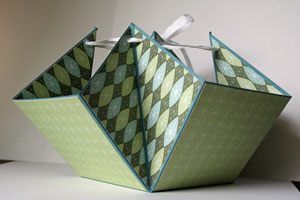
Stuffed full of candy, cookies or potpourri, this easy-to-make box is sure to be a hit!
I thought this would be a cute project to share... I haven't been able to get on in a few days since I've been busy with Vday plans...Hope everyone is enjoying the sites i've been stumbling upon!!! ~Val
Supplies
Paper cutter with scoring blade
One 12"x12" piece of cardstock
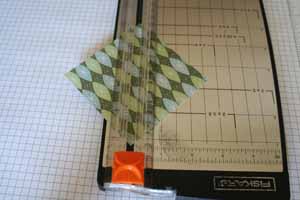
Eight 3 3/4" squares of Patterned Paper A
One 3 7/8" square of Patterned Paper A
Eight 3 7/8" squares of Patterned Paper B
Adhesive
Eight Eyelets
Crop-a-dile™
Ribbon
Bone Folder
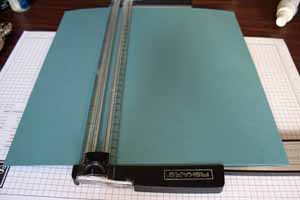
Step-by-Step
Step 1
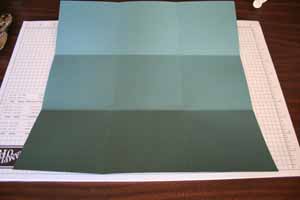
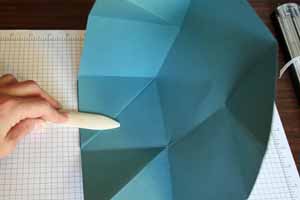
Score 12" x 12" cardstock at 4" and 8".
Step 2
Turn cardstock 90 degrees and score at 4" and 8".
Step 3
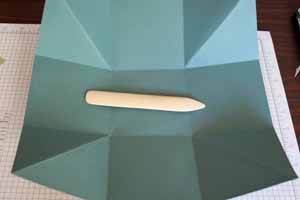
Prefold all scores.
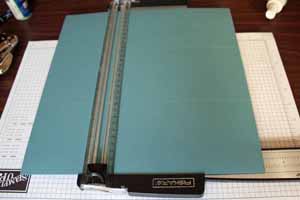
Step 4
Fold one corner square over to a center square to create a diagonal fold in the corner square.
Step 5
Add a diagonal fold to all four corner squares.
Step 6
Cut all 3 3/4" patterned paper squares in half diagonally.
Step 7
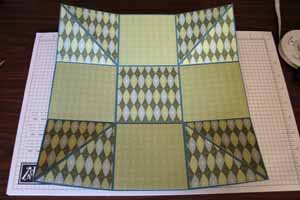
Tape the triangle shapes to the outer squares and tape the 3 7/8" paper squares in Pattern B to the scored squares of the box inside.
The one 3 7/8" square of the Pattern A paper goes in the center of the box.
(The inside of the box is the side that has the diagonal fold going in.)
Step 8
Flip cardstock and decorate the outside.
There's no need to add patterned paper to the center panel as this will be the bottom.
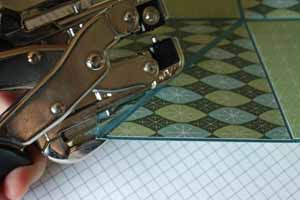
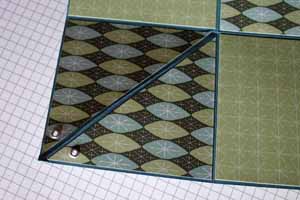
Step 9
Punch a hole in each of the outer corners.
Step 10
Add an eyelet to each of the punched holes.
Step 11
Thread a 24" piece of ribbon or cord through the eyelets and tie to hold the box together.
Step 12
Finished box.
Here is the Video in case you all would like to see it done before your eyes!!! Its pretty simple to do and looks gorgeous!!!